Growing and Using Herbs: Cilantro

cilantro

There aren’t too many things that are better than fresh homemade salsa with cilantro form the garden!  It also has some amazing health benefits too!   This is a picture I took back in May from cilantro seeds I grew last fall.  It had only come up maybe an inch before the weather got cold and the days became shorter and stopped growing.  As the snow covered the ground during the winter it helped to insulate the little cilantro leaves just enough to protect it from the hard cold temperatures we had.


Cilantro is known for being an effective toxic metal cleanser! It is a powerful herb with natural cleansing properties. The chemical compounds in cilantro bind to toxic metals and loosen them from the tissue. Many people suffering from mercury exposure report a reduction in re-occurring feelings of disorientation after consuming large and regular amounts of cilantro over an extended period. Make sure the cilantro you use is organic, otherwise it may have already pulled those toxins into the plant!  The best way to know for sure is to grow it yourself or buy from a reliable organic source!  Cilantro also has strong antioxidant properties, has been known to aid in improving sleep and also has very strong anti-fungal and anti-bacterial properties.


I often get the question, “How can I make my cilantro last a little longer in the garden? It always seems to bolt quickly.”  It can bolt quickly, especially when the temperatures become warmer.  I plant my cilantro seeds (coriander) every two weeks so I am constantly harvesting throughout the growing season. It also reseeds itself very easily if you let it flower and allow the flowers to dry and produce seed.  The seeds you sow in the spring will produce more seed from mature plants.  As they drop to the ground you may find new little cilantro plants start to come up in the fall and even the following spring.  Cilantro grows well in rich, well draining soil and does not like to be removed once it has been planted either by direct seed or transplanting.  It prefers full sun, but will grow in some shade too.  Sow the seeds 1/2″ deep and thin every 4-6 inches.  When using cilantro for cooking, use the young leaves that are broad and shiny.  They tend to be less bitter and add incredible flavor to many dishes!  Here are a few of my favorite recipes using cilantro!


Ingredients for guacomole

Fresh Guacomole

Recipe:

This homemade guacamole is so good, you may find that after one taste, there won’t be any left to share with others!  This is one of our family favorites and it is so good for you!
4 medium or 3 large ripe avocados, smashed
1/2 red onion, finely chopped
2 serrano peppers, seeded and minced (add more seeds later to increase heat)
2 limes, juiced
1 bunch cilantro, chopped
salt and pepper to taste
Mix all ingredients together in a medium size bowl and serve with organic corn chips or on a whole grain tortilla!  Delicious!
Southwest Black Bean Salad
A delicious and refreshing salad!  A great addition to any meal!

Recipe:

8 cups shredded red leaf lettuce (1-2 heads)
2 cups cooked or canned black beans, rinsed and drained
2 cups bite-sized sweet red pepper strips
2 cups frozen or fresh corn kernals
1/4 cup cilantro (about 1 bunch)
1/4 cup orange juice
1/4 cup cider vinegar
1/4 cup organic canola oil
1 teaspoon ground cumin
1/2 teaspoon sea salt
1/8 teaspoon red pepper flakes
Combine in large bowl the lettuce, beans, peppers, corn kernels and cilantro.
For dressing combine the remaining ingredients listed in a tightly sealed jar or Tupperware bowl and shake until mixed well.  Drizzle over salad.  Eat immediately.
Southwest Quinoa Salad
Perfect for lunch or a side for dinner!  This super healthy and delicious recipe is so simple!  I got it out of one of my favorite recipe books called, “Quinoa, The Everyday Super Food”.

Recipe:

2 cups water
1 cup quinoa, uncooked
1/3 cup olive oil
1/3 cup freshly squeezed lime juice
4 tsp. apple cider vinegar
2 1/2 tsp. ground cumin1 jalapeno, seeded and minced
1 1/4 cup frozen corn kernels, thawed
1 chopped red bell pepper
1 (15oz.) can black beans, rinsed and drained
1/3 cup chopped fresh cilantro
2 avocado,s chopped
sea salt and pepper to taste
Cook quinoa with the water in a rice cooker or on the stove like you would rice.  While that is cooking. mix together the olive oil, lime juice and vinegar in a small bowl.  Once the quinoa has finished cooking and has slightly cooled, place the dressing over the quinoa in a large bowl and allow the warm quinoa to infuse the flavors.  Chop and add the rest of the ingredients to the quinoa and check to see if more salt and pepper is needed.  Can be kept in an airtight container for up to 3 days in the fridge.

Growing and Using Herbs: Chamomile

Chamomile plant

Chamomile is one of my favorite herbs!  It’s fragrance has a light hint of apple with earthy undertones!  Chamomile is an annual grown easily from seed or starts form your local nursery.  It has very calming effects on the nervous system and is a great digestive aid!  Whenever I feel as though my day has all but done me in, I make myself a cup of tea, sit back and read a good book!  Most of my chamomile grew from reseeding itself last year and popped up perfectly around the small brick wall surrounding my peach tree.  It’s very easy to grow and likes well draining, poor soil if you can believe it, hence it growing practically in the compact sand I have around my garden boxes! …well it’s better than weeds! 🙂
Chamomile has many benefits!
  • It relaxes the muscles in the uterine wall relieving menstrual cramps.
  • Is an excellent sleep aid.
  • Chamomile soothes stomachache muscles to help alleviate bowel problems and aids in digestion.
  •  Because of the antibacterial properties found in chamomile, a cup of hot tea can help fight common colds.
  • Apply a paste of chamomile flowers on wounds to make them heal faster, improving the quality of skin from the oil of the flower.
  • Chamomile tea is good for preventing the escalation of diabetic ailments.


 How to harvest and make chamomile tea:
  • Here is a link to a perfect video on how to harvest your chamomile!
  • Essentially you are going to want to harvest the flowers just as they open up and create a nice flat disc.  Once the petals begin to curve down, they are bit past their prime.  At this point you can either still harvest or allow them to go to seed.  Here is a great video on how to save the seeds.  Keep harvesting the flowers and you will keep getting more and more!

Harvested Chamomile Flowers

  Once you have plucked the chamomile flowers from the plant spread across a paper towel and allow to dry completely, about 5-7 days.

Dry Chamomile Flowers

Once completely dried, place inside a glass container to stay fresh for1 year.

Mesh Tea Infuser

When I make tea from my own herbs I like to use a 2-1/2 mesh ball.  This keeps the herbs contained and allows them to steep appropriately. To make tea with your chamomile flowers, boil a few cups of purified water.  Fill your mesh tea infuser with your herb of choice and place in either a tea cup or in the tea kettle once off the heat.  Never boil herbs.

Chamomile Tea

Allow the herbs to steep in the hot water for 15 minutes.  Enjoy!

Fresh Herb Grilled Chicken

Fresh Herb Grilled Chicken and Warm Cinnamon Honey Butter Pineapple

This is one of the best recipes for chicken I have ever had!  It’s bursting with flavors from the herb garden!  Serve it with warm cinnamon honey butter pineapple!

Fresh Herb Grilled Chicken

Serves 8

1 T. fresh thyme, chopped finely

1 T. fresh sage, chopped finely

1 T. fresh rosemary, chopped finely

2 T. fresh parsley, chopped finely

2 T. fresh basil, chopped finely

2 garlic cloves minced

1/2 cup extra virgin olive oil

zest of 1 lemon

juice of 1 lemon

1 teaspoon kosher sea salt and freshly ground black pepper

8 chicken breasts, organic


Combine all ingredients together in a large bowl or plastic bag.  Marinate in refrigerator for at least 2 hours or over night.  Grill the chicken until just cooked through.  Serve immediately


Warmed Pineapple with Cinnamon Honey Butter

Cut a large pineapple into spears.  Spread a good quality cinnamon honey butter (or make your own) on the pineapple and wrap in foil.  Place on grill and heat through.  Serve warm!


Growing and Using Strawberries

Sea Scape Strawberries

Every garden should have a small strawberry patch in my opinion!  Nothing beats the burst of flavor from a home grown strawberry!   They are easy to grow in a container or in the ground.  Most strawberries produce their best within their first 5 initial years.   There are 3 different types of strawberries:

  • June-bearing – produce an abundant crop one time in June.  Good for making jam or canning.
  • Ever-bearing – produce in the late spring and late summer.  Can produce during the middle of the summer if temps are cool enough to allow the plant to set flowers.
  • Day-neutral – once established and have reached maturity, the plants will produce all summer long, increasing yields with cooler temps.

All varieties require at least 8 hours of sunlight to produce good fruit.  Strawberries prefer well-draining, rich soil that has been amended with lots of organic matter.  They can be susceptible to root rot if grown in heavy wet soil.  The best time to buy strawberry plants is in the early spring in bare-root form.  They usually come in bundles of 10.  Make sure the roots look healthy and have stayed moist.  Larger potted plants are more expensive and do not produce more than less expensive bare-root plants.

After the first year, the first daughters (or runners) can replace the original mother plant.  This keeps the fruit production high and the size large.  Remove any other runners that come off the 1st daughters.


Harvested Strawberries

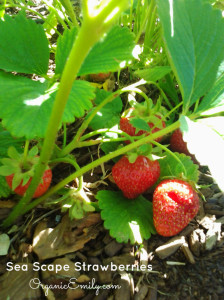
  I grow an ever-bearing variety called “Sea Scape” for it’s large berries and wonderful sweet flavor.  Just this year so far I have harvested about 4lbs.  Here are just a few recipes we love using our own home grown strawberries!

Strawberry Pecan Feta Salad

This simple and beautiful salad will impress anyone over with it’s candied pecans, fresh strawberries and creamy feta cheese!  I love to serve it with a homemade strawberry balsamic vinaigrette!

Strawberry, Pecan, Feta Salad

Serves 8

1 cup candied pecans

2-4 T. agave

2 lbs. fresh strawberries, hulled and halved or quartered depending on size (reserve 1/3 cup berries for dressing)

12 cups fresh greens from the garden or organic spring mix

1 (7-ounce package) crumbled feta cheese or more if you like

Spray a large skillet with non-stick cooking oil.  Add the pecans and agave.  Stir continuously until thickened and the pecans are coated well.  About 10 minutes.  Be careful not to let them burn.  Remove from heat.Prepare the greens, strawberries and feta in a large salad bowl.  Add the pecans once completely cooled.  Just before serving, drizzle the dressing and toss.


Strawberry Balsamic Vinaigrette

Mix 1/2 cup olive oil, 1/3 cup strawberries, 3 T. balsamic vinegar, 1 T. sugar and salt and pepper to taste in a blender.  Pulsing a few times leaving a few chunks of strawberries.  Drizzle over salad just before serving.


Strawberry Freezer Jam

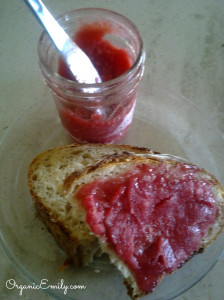
Freezer jam is so easy to make!  No hassle and it’s quick!  It has less sugar than other preserves, making it a healthier alternative without the loss of flavor!  Try eating some with my Rustic Rosemary Loaf!  https://rootedemily.com/?p=197

Strawberry Freezer Jam

4 cups mashed strawberries or fruit of your choice.  I like to use my blender.

1 cup organic sugar

1/3 cup instant clear gel

Mix together the sugar and clear gel then add the berries.  Place in jars of your choice, leaving a 1″ head space.  Place the lid on and freeze!  Can be kept in the freezer for up to 6months.


Strawberry Country Cake

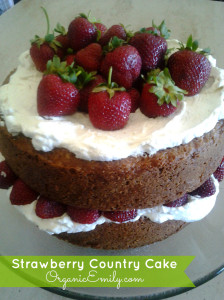
This beautiful cake says summer time!  Made with lemon and orange zest, it adds a delightful addition to any gathering!  From the Barefoot Contessa cookbook “Parties”!

Strawberry Country Cake

For the cake:

3/4 cup softened butter

2 cups sugar

4 large eggs at room temperature

3/4 cup sour cream at room temperature

1/2 teaspoon lemon zest ( 1 lemon)

1/2 teaspoons orange zest ( 1 orange)

1/2 teaspoon pure vanilla extract

2 cups all-purpose flour

1/4 cup cornstarch

1/2 teaspoon salt

1 teaspoon baking soda

For the Topping:

2 cups heavy whipping cream, chilled

4 tablespoons sugar

1 teaspoon pure vanilla extract

2 pints fresh strawberries, hulled and sliced


Preheat oven to 350`.  Butter or spray two 8-inch round cake pans.

Cream the butter and sugar on high speed until light and fluffy in the bowl of an electric mixer fitted with a paddle attachment.  On medium speed, add the eggs, sour cream, zests and vanilla.  Mix well.  Sift together the flour, corn starch, soda and salt.  Add the flour mixture slowly into the batter.  Mix until just combined and smooth.

Pour batter evenly into pans, smooth tops with spatula, and bake in the center of the oven for 40-45 minutes.  Let cool in pans for 30 minutes, then remove to wire racks and let cool to room temperature.

To make filling and topping, mix the cream, sugar and vanilla with beaters until stiff peaks form.  You can either stack the cakes on each other or slice them in half, layering with 4 levels.  Place the cream on each layer, topped with berries and repeat until complete.   Serve immediately!


Rosemary Rustic Loaf

Rosemary Rustic Loaf

This is a wonderful recipe for those just beginning to bake bread!  I love that it doesn’t take a lot of time to prepare, just a bit of thinking ahead!  The crusty outside and soft chewy inside make this the perfect bread for dipping into soups or sauces!  I found the recipe from “America’s Test Kitchen Baking Cookbook”.  I recommend reading through the directions of the recipe first before proceeding.
3 cups all-purpose flour ( I used 2 cups spelt flour and 1 cup all-purpose flour)
1/4 teaspoon instant or rapid-rise yeast
1 1/2 teaspoon salt
1-2 tablespoons fresh rosemary, chopped (optional)
3/4 cup water, room temperature
1/2 cup mild beer (I use non-alcoholic Odoul’s and make 3 loaves at a time from one can), room temperature
1 tablespoon white vinegar
Whisk together the flour, yeast, salt and rosemary if using.  Fold in the water, beer and vinegar until the dough starts to come together and looks shaggy (I like to make sure the flour is mixed in all the way).  Cover with plastic wrap and allow to sit at room temperature for at least 8 hours or up to 18 hours.
Once the dough has risen and you are ready to continue, turn the dough out onto a well floured surface and knead by hand to form a smooth, round ball.  Place a piece of parchment paper that is 18×12-inches inside a 10-inch skillet.  Place the dough on the parchment and spray with non-stick oil, cover with plastic wrap and allow to raise until doubled in size, about 2 hours.
About 30 minutes before baking turn the oven on to 500` with the rack at the lowest setting.  Place a large, cast iron dutch oven with lid, on the rack and allow to heat up with the oven.
Score the top of the loaf with a very sharp knife and sprinkle a little flour on top.  Once the oven has reached 500` carefully remove the dutch oven and lid.  Place the entire loaf and parchment paper directly into the pot, place the lid back on and put the dutch oven back into the oven.  It is okay to let some of the parchment hang over the edge of the pot.
Once the pot is back in the oven immediately turn the oven down to 425` and bake covered for 30 minutes.  Remove the lid of the pot and bake for another 20-30 minutes until the crust is a deep golden brown.  Let cool on a wire rack at room temperature for about 2 hours before serving.

Growing and Using Medicinal Herbs: Raspberry Leaves

Raspberry Bush

Growing Raspberries

Every garden cannot be complete without a raspberry patch!  Those delicious sweet juicy red berries are one of God’s greatest gifts to man in my opinion!  I grow mine where they can’t take over to quickly, inside a garden box with the house on one side and the driveway on the other.  They really love to spread!  Raspberries are native to Utah and grow well up in the mountains!  They prefer to have morning sun so they will do best on the east side of a garage, shed or house.   Make sure they get at least 8 hours of sunlight to produce fruit.  They are big water feeders and really prefer to be mulched with compost to keep the moisture in and regulated.  Raspberries are very easy to grow, however they can be prone to iron chlorosis.  I will give mine a dose of chelated iron (slow release) every 4-5 weeks to keep the leaves green and health.

Drying Raspberry Leaves

Using Raspberry Leaves

  • Raspberry leaves have been known as a female herb for centuries.
  • Many people including myself have used it to strengthen the uterine wall while relaxing the smooth muscle inside the uterus to help alleviate cramps.  Some even claim that it improves the chances of implantation and decrease the risk of having a miscarriage.   The leaves are also full of vitamins, minerals, and plant compounds that help the body to detoxify excess hormones that may impede conception.
  • During pregnancy, one cup of tea can help with morning sickness, strengthen the baby in utero with all the nutritional benefits it provides and has been reported to reduce leg cramps and swelling in late pregnancy.   The tea benefits the labor process as well, strengthening and shortening the durations of contractions. The benefits raspberry leaf tea provides for mother and baby after birth are rich breast milk due to the high levels of minerals as well as helping to regulate postpartum hormones bringing mom back to a healthy state of mind.  Some women need to be cautious while using raspberry tea during pregnancy if they have experienced C-section (past or planned), premature labor, bleeding during pregnancy, expecting twins or any other complications.  Always talk to your health care provider first before taking any supplements during pregnancy.
  • Even if you are not interested in getting pregnant raspberry leaf tea can help reduce cramping and regulate hormones, decreasing PMS.
  • The nice thing about raspberry leaf tea is that it is a balanced food so it’s safe for virtually everyone at every stage of life.  My 8 year old daughter loves to drink it!


Harvesting Raspberry Leaves

The best time to harvest raspberry leaves is in the late spring through early summer.  I cut enough every year to fill a gallon glass jar with dried leaves.  It’s easiest to dry the leaves in a dehydrator, but you can do it outside in the shade of a tree on a screen too.

Once the leaves are dry, place them in a cool dark place.  They should keep for a few years.


Emily’s Favorite Tea Blend

1 tablespoon dried raspberry leaves

1 tablespoon dried chamomile flowers

1 tablespoon dried peppermint leaves

4 cups purified boiling water removed from the heat.  Place the herbs in a tea infuser and let steep in hot water for 15-20 minutes.  Enjoy!


Garden Salads

Fiesta Salad

There aren’t too many things in this world better than walking out into my own back yard using the food I grow to make delicious meals.  Whether I add a few things to a dish or make the meal mostly from what I grow I always feel a sense of satisfaction that I grew it with my own two hands!  Fun and satisfying salads in the summer are a staple in our home, especially when we have such abundance!  They are light and easy, just what we need this time of year with all the busyness of being outside and enjoying family and friends!
In the picture above is one of my favorite salads!  I call it “Fiesta Salad”!
From my garden: heirloom lettuce, spinach, radishes, cilantro

Recipe:

Leafy greens of your choice, chopped
Cilantro, chopped
Radishes, chopped
Tomatoes, chopped
1 can black beans, drained and rinsed
1 cup frozen corn
2 avocados chopped
Juice of 1 lime
Good ranch dressing
Garden Beet Salad
This is one my dad made for me.  It was so good I had to share!
From the garden: lettuce, Swiss chard, spinach, beets, sun sugar tomatoes

Recipe:

Chopped leafy greens of your choice
Spiraled beets
Chopped pears
Whole sun sugar tomatoes
Balsamic vinaigrette
Spinach, Tomato, Avocado Quinoa Salad
This quinoa, spinach, tomato and feta salad is very satisfying!  Perfect for a light meal!
From the garden: spinach, fresh chopped basil or parsley, red onions, tomatoes

Recipe:

2 cups cooked quinoa
2 chopped avocados
2-3 large tomaotes, chopped
4 cups shredded fresh spinach
1 small red onion chopped
1 cup crumbled feta cheese
1/2 cup fresh chopped basil or parsley
Salt and pepper to taste

Growing and Using Medicinal Herbs: Comfrey

Comfrey Plant

Comfrey is a wonderful herb with  multiple benefits!  The plant is very easy to grow and can be harvested multiple times a season.  It grows well in full sun and well draining soil.  One of my favorite comfrey products I use is a salve called Dr. Christopher’s Complete Bone and Tissue for all my physical aliments!  It contains comfrey and other herbs.  It is simply magical!  As a fitness instructor for over 10 years who teaches multiple classes a week my body has begun to… well let’s say get a little older and over used so to speak.  I have a bulging lower disc in my spine, knee pain and a weak rotator cuff.  Whenever anything starts to flare up I put the salve on a few times a day and within a couple days I am back to normal again!  I cannot say enough about comfrey!

Medical Benefits of Comfrey

  • Comfrey is good for fracture healing and bone lesions.
  • Comfrey is beneficial for treatment of muscle tears, sprains, strains, and dislocations.
  • Comfrey helps in arthritic conditions of bursitis, tendinitis, and torticollis.
  • Comfrey treats arthritis such as rheumatoid arthritis and osteoarthritis.
  • Comfrey is good for treating bunions and deformities of extremities.
  • Comfrey helps in treating intervertebral disc lesions and herniated discs.
  • Comfrey is good for circulatory system and improves poor circulation and varices.
  • Comfrey treats skin deformities like minor wounds, minor burns, fistulas, and psoriasis.
  • There are millions of comfrey natural products available in the market, the most prominent of which is comfrey gel which helps in treatment of some types of eczema, cracks in breasts, and varicose ulcers
  • For more info go here

Harvesting Comfrey

  • Here is an excellent video on how to harvest comfrey!

There is controversy over whether comfrey should be ingested or not.  Studies have shown that comfrey taken internally can be dangerous due to it’s high levels of alkaloids, potentially harming the liver.  However, the studies are a bit misleading in my opinion.  They do show that the alkaloids could be dangerous, but that is because very large amounts were taken internally.  More so than what the average person would normally ingest, however it is important to use caution.  I know many people who have taken it internally and are just fine.

Dried Comfrey

You can make a basic salve recipe with the dried comfrey leaves and roots.  Anytime you use a root over the leaf or flower of the plant it will always have stronger constituents.

Comfrey Oil

 The first step in making your own medicinal salve is to make a solar infused herb oil.  This can even be done with herbs for cooking.  Fill a clean and dry wide mouth jar with dried herb leaves or roots.  Cover with 2 inches of good olive oil.  Cover tightly and allow to sit in a warm sunny spot for 2-4 weeks.  The longer you allow it to sit the stronger it will become.  You might expect the oils to go rancid, however as long as the herbs are infusing the oils they won’t due to the antioxidant properties found naturally in plants.

Straining Herbs 1

 Strain the herbs through a sieve after the oil has been infused.

Straining Herbs 2

Strain further into a cheese cloth or piece of muslin.  Be sure to squeeze the last bits of oil from the drained herbs into the bowl.

Homemade Salve

Now the salve is ready to be made!


Basic Salve Recipe


For each cup of infused herb oil, add 1/4 cup (finely chopped or shredded) beeswax.  Heat the oil and beeswax together over very low heat, stirring occasionally, until the beeswax has melted.


To ensure the salve is the thickness you desire, place 1 tablespoon of the mixture onto a spoon and put in the freezer for a minute or two.  Then check for firmness of the salve.  Add more beeswax if you desire a more firm ointment.  For a softer salve add more oil.


Once the mixture is the consistency you want pour immediately into small glass jars or tins.  Be careful the oil is extremely hot!  I get me supplies from here.


Store salve in a cool, dark place, where it will keep for several months.  Add essential oils to enhance aroma and medicinal purposes.


Beneficial Insect and Butterfly Loving Plants

Wegelia

I love to be in nature!  Whether I am in my own garden growing something beautiful and delicious or up hiking in the mountains I always feel a sense of peace!  Being in nature is my therapy to get me through the stress of life!   There is a spiritual side to nature that brings a feeling of reverence and thanksgiving for the Creator of all things as each multiplies and replenishes this earth.  Each insect, animal, shrub, plant and tree all have a purpose.   Some of those purposes include pollination of many plants.  In fact 60% of our food has to be pollinated by insects.  That’s a lot!  The honeybee is a big contributor to pollinating the food we eat.  Many honey bees have been dying off for reasons no one quite understands.   Recently there has been a great movement happening!  People are keeping honeybees in their own backyards in the cities and suburban communities!  I have been keeping bees for 2 years now and love it!  There is a lot to know and understand, but once I got the hang of it, it really has become very low maintenance and thoroughly enjoyable!  I plant lot’s of beneficial insect loving plants!  They not only beautify my yard and home, but also provide the necessary pollen and nectar for my bees as well as wild beneficial insects too!  Here are some I like to grow, both perennial and annual!

Bee balm

Bee balm is  from the mint family and is a perennial.  It’s not as invasive, but still can spread.  The flower is a a favorite to the humming bird and also edible for humans!  Try throwing a few blooms into a salad!

Green Onion in Bloom

Bees love onion blooms!  Onions that bloom the second season are great for saving seeds!  This honey bee was hard at work collecting pollen as I harvested my chamomile!

blue perrenial salvia

Blue Salvia is a beautiful June perennial.  Cut back the dead after it blooms and it will flower again!

yarrow

Yarrow attracts many types of beneficial insects and blooms all summer long!

Cosmos

Cosmos is an annual that self seeds very well!  It comes in many colors and both tall and short varieties.  Honeybees love this one too!

Echinacea

Echinacea is a perennial that gets bigger every year!  The leaves, flowers and roots can be harvested for medicinal purposes!

Blue Sage

Blue sage, an edible herb used for stuffing on Thanksgiving day at our house!  Can you see the honeybee?

English Thyme

Another favorite herb for both bees and humans, but especially bees if allowed to flower!

Horehound

This low growing perennial is covered in bees in the spring when it blooms!  It can also be used to make homemade cough syrup!

Lavender

Lavender is a favorite of honey bees.  So is Russian Sage, both look similar but I grow the lavender to harvest for myself!

ground cover 1

Wooly Thyme is a great perennial ground cover to help prevent weeds and the honeybees love it too!

Oange Zinnia

Zinnias come in all shapes, colors and sizes!  Many insects are attracted to this beautiful annual, like butterflies, honey bees and humming birds!

St. John's Wort

Honey bees are all over this beautiful perennial towards the end of June!  I’ll be harvesting some of my blooms for making a skin healing salve soon!

These are just a few  plants that benefit our much needed insects to do the hard work of pollination!  Other plants  not shown are Blue Beard, Butterfly Bush, Coreopsis, Black Eyed Susan (Rebekiah), Chrysanthemums, Yarrow, Red Clover and many more!  Grow your own beautiful plants to help the honey bees and our local farms and neighborhood gardens!

DIY Rose Water

Old Fashioned Rose

It’s that time of year I yearn for throughout the winter months when the roses and the peonies bloom!  Rosa Rugosa is a beautiful rose that produces rose hips, or fruit from the rose after blooming.  I intentionally purchased this particular shrub because of the color and the availability to use the hips for jelly and other purposes.  Rose hips are very high in Vitamin C, in fact they contain 50% more than oranges!  Rose hips are also used in tea to relieve constipation.  More on the benefits and uses of rose hips later when I can harvest them!

While the blooms are big and beautiful I like to harvest a few cups to make rose water!  I use rose water as a natural toner for my face and body after cleansing.  There are many other reasons why a person would use it, here are just a few:

  • Rose water is a gentle astringent safe enough for acne prone, oily or aging skin by reducing inflammation and redness caused by enlarged capillaries.  It has also been tested to bring the Ph levels back to normal so the oil glands don’t have to over produce causing further problems.
  • Rose water used as a warm tea infusion for the bath can help reduce general stress but also abdominal stress, specifically for those who suffer from bladder infections.
  • When sprayed on hair it has been known to increase blood flow to the scalp to nourish and strengthen hair follicles and prevent hair loss.
  • Rose water is also high in Vitamin C, A, D B3 and E.  Improving the overall health of skin and hair.


Rose Petals


How To Make Your Own Rose Water

  • Gather 1 cup packed fresh organic rose water.
  • Wash with purified water to clean any insects or dirt off.
  • Bring 2 cups distilled or purified water to a boil.


Steeping Rose Petals

  • Take the pan away from the heat and place the rose petals inside.  Cover with a lid for 30 minutes allowing the rose petals to steep and the water to take on the color and oils of the roses.


Straining Rose Petals

  • Strain the roses through a sieve and squeeze all the remaining water and color out of the petals.
  • Strain a second time through muslin or cheese cloth.


Rose Water Bottle

  • Store cooled rose water in a spray bottle.
  • Keep in the fridge for up to 1 week or place a few drops of lavender essential oil to help preserve longer.
  • Other natural additives may be 3-4 drops vegetable glycerin for hydration, 1/2 tsp almond oil or other favorite essential oil.