Spinach, Pesto Pea Salad

Spinach, Pesto Pea SaladThis simple salad is to die for!  It’s flavor is out of this world good!  How can it not be when the dressing is all basil pesto?

Recipe

8 cups fresh spinach

1 cup chopped almonds

1/2 cup fresh Parmesan

2 cups frozen peas, thawed

1-2 cups fresh basil, homemade recipe here

Mix all ingredients except for the pesto in a large serving bowl.  Mix in the pesto just before serving.


Chicken Salad with Fresh Tarragon and Grapes

Chicken VeroniqueThis salad is good on bread or rolls for a sandwich or simply on greens.  The fresh tarragon gives this dish a fabulous flavor with a yummy crunch from the grapes and celery!

Recipe

4 chicken breasts, bone in, skin on
good olive oil
kosher salt and pepper
Rub chicken with olive oil, salt and pepper.  Roast in a 350 degree oven for 40-50 minutes until done.  Let cool slightly and then chop into bite size pieces.
In the meantime, mix together in a large bowl:
1/2 cup good mayo
1 1/2 tablespoons fresh chopped tarragon
1 cup celery, diced small
1 cup green or red grapes, cut in half
Add the chicken, mix until the chicken is coated in the sauce and chill for 4-24 hours before serving.

Quinoa Tabbouleh

Quinoa TabboulehSpring is in the air and those cold hardy herbs like mint and parsley are waking up from their winter’s sleep!  This salad pulls those herbs from the garden to your table and is so delicious and satisfying!  I love the sweetness from the cucumber and mint and the tang from the tomatoes and lemon!  Great for lunch or a side for entertaining!

Recipe

1 cup quinoa

2 cups water

1/4 cup fresh lemon juice

1/4 cup olive oil

1 teaspoon kosher sea salt

1 teaspoon freshly ground black pepper

1 English cucumber, chopped

2 cups cherry tomatoes cut in half

1 cup chopped scallions (about one bunch)

1 cup chopped fresh mint leaves

1 cup chopped fresh parsley

Cook the quinoa and water over the stove top or in a rice cooker.  If using a stove top bring to a boil and then cover and allow to simmer until cooked through.  Chop all herbs and veggies and place in serving bowl.  While still hot add the oil, lemon juice, salt and pepper to the quinoa.  Once the quinoa has cooled, but is still warm add it to the veggie/herb mix and combine.  Allow to sit for a few hours in the fridge before serving so the flavors can improve.  Enjoy!

“Bones” of the Garden

Vegetable Garden 1Spring clean up can be so much fun especially after being cooped up inside all winter!  It takes me about a full week to prune, clean the beds of any debris/leaves and lay down compost.  Above is a photo of the “bones” of my garden.  You can see my chicken coop in the background and a few vertical structures for vine crops to grow up.  In front is a hoop house frame I use to grow cold crops in the fall and preserve throughout the winter.   I grow most of my veggies in garden boxes.

Bones of the Garden 2Here are all 8 grow boxes on the east side of the house.  This entire area gets at least 8 hours of sunlight in the summer, except for the bed right up against the house.  There I get about 6-7 hours and grow currants and elderberries ( you can also grow leafy veggies in 6 hours of sunlight too).  It is very important to create a plan before just throwing down soil, boxes and plants.  Think about how much sunlight the plants will need (at least 8 hours for most), and if it is functional and easily accessible.  For example, be sure to allow a wide walk way for a large wheelbarrow to bring in good organic compost every year.

Bones of the Garden 3My Early Elberta peach tree with scallions planted all around to help deter peach borers (any allium family member should help).  Another great way to deter pests, including borers is to cultivate the soil every 2 weeks, 2-3 feet from the trunk out and about 2-3 inches deep.  This will interrupt the life cycle and kill off eggs and larva.  It has been pruned as an open center tree to allow sun light into it to ripen the fruit.  In the background is another vertical stand for my grapes to grow up and out.

This week I have been busy getting the soil ready to plant my cold crops tomorrow!  The weather has been fabulous!  Whether you grow your produce in garden boxes or in the ground you need to make sure the soil is workable.  A simple test to see if it has dried out enough is to take a handful and squeeze it, if it retains the shape of your hand mark then it may still be too wet.  You can also drop the handful to the ground, if it stays in a clump it isn’t ready.  If it falls apart you are good to go!  Any raised bed method is going to dry out much quicker than just straight from the ground.  If you want to speed up the process of heating up the soil, put down some clear plastic, anchored with rocks for about a week.  This will heat up the soil and dry it out faster for planting earlier.

As far as soil preparation goes I bring in good organic compost every year, like Nuri-mulch or Furti-mulch.  I dump wheelbarrow loads into every garden box along with a good, dry, ORGANIC, low number fertilizer (usually containing beneficial bacteria and mycorrhizae (beneficial fungus)).  The low numbers in the fertilizer won’t burn the seeds and give the plants the healthy head start they need.  I do not use chemical fertilizers for the reason they kill many micro-organisms that actually help protect and keep the plants healthy from disease and pests.  Besides who wants to eat chemicals anyways?  I don’t till my soil.  I use a vertical till process that is gentle on those precious micro-organisms.  Take a shovel or garden spade (large fork) and gently turn the soil.  Smooth out with a rake.  It’s as simple as that!  I also recommend watching a wonderful documentary called “Back to Eden”  found online www.backtoedenfilm.com  it is a no till method all together.  The weather is perfect this week in Utah!  Get out there and plant something new!  Happy gardening!

Starting Seeds Indoors

Seed Stand
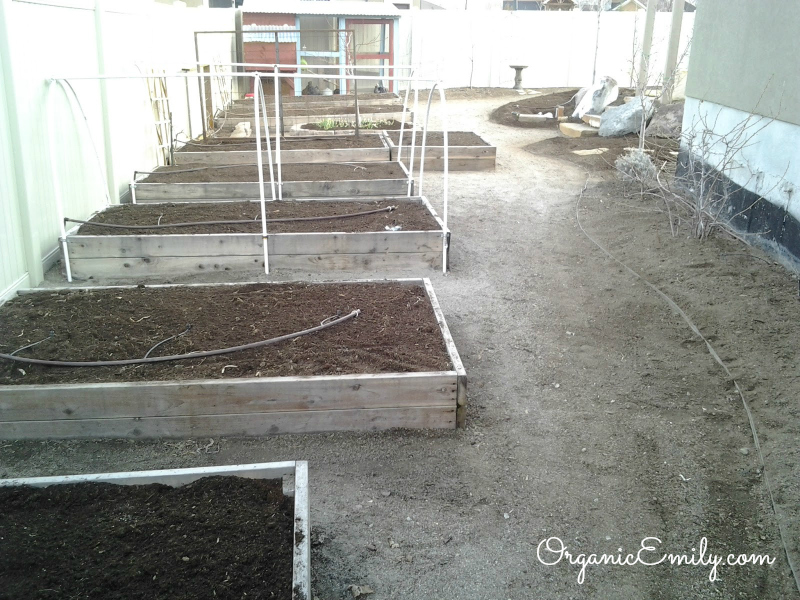
Seed starting at home can be fun, inexpensive and educational!   There are a few pieces of equipment that are needed to get started.  After the first initial purchase it’s all pennies from there!  There are many ways to start seeds indoors and lots of products to choose from.  But, I like to think I found the most economical way to do it!  A friend of mine introduced me to soil blockers!  Pictures of these soil blockers of all sizes can be found at this website here

Helping to start seeds indoors
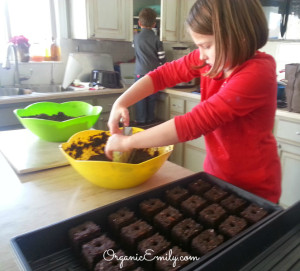
In this picture my daughter is using a soil blocker to stamp the soil into blocks for planting. We use a 2-inch soil blocker.  This makes it easy to plant directly into the ground when the seedlings are ready in 6 weeks!

In addition to the soil blocker, you will need simple black plastic trays without holes in the bottom that come with lids.

Light Structure Chain
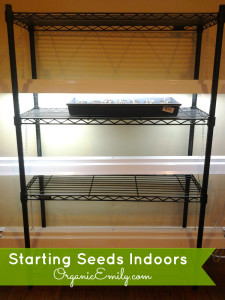
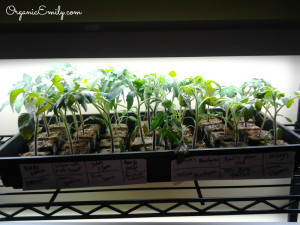
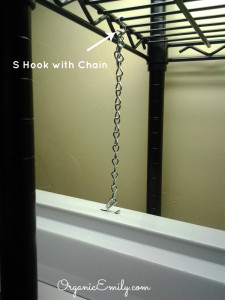
You will also need a stand to hang lights and to place trays onto.  I think a simple wire rack is perfect for hanging the light structures without having to buy extra long chains.  The lights that I use are T-8 florescent lights.  Many people will tell you to use full spectrum lights but it isn’t really necessary and not as cost effective.  I can fit 3 light structures with 2 bulbs for each structure onto my stand of four shelves.  The total cost for my set up was around $100.  I love my shelf because I can fit 6 trays with 28+ plants in each.  That’s a lot of plants!

Soil Blocks
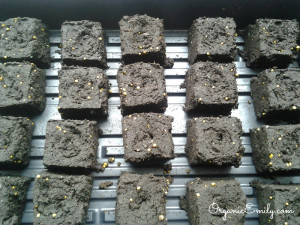
Here is a closer look at the soil blocks.

To prepare the soil, mix warm water with good potting soil in a large bowl or rectangular tub until it comes to an oatmeal consistency.  Press the soil blocker into the soil until it has compacted into the stamper and then stamp into a black tray.  Place 2-3 seeds inside the hole provided by the soil blocker or if using small pots poke holes into moistened soil.  Cover gently and add a clear plastic cover or plastic wrap so the moisture stays within the container.  You want to create a small green house for the seeds to germinate.

Covered Soil Blocks
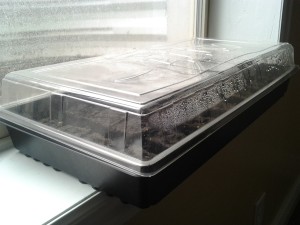
Notice the tray above has some condensation built up on the walls.  This is a good thing!  You want the moisture to stay within the container so the seeds never dry out, otherwise they won’t germinate!  Place in a warm sunny window or warm room.  Electric heating mats are a great option as well!  I prop mine up over heater vents in rooms that aren’t used as much.  The seeds don’t necessarily need light to germinate, only warmth and water.

Germinated Seeds
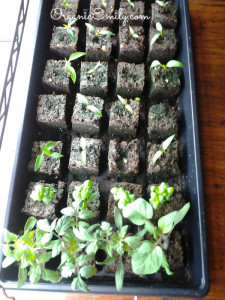
Once most of the seeds have germinated get them under lights as soon as possible.  The lights need to be placed 1-inch directly above the lights to ensure strong leaves and stems.  This keeps the plants from getting leggy.

Seedlings Under LightsAs you keep your plants under lights, it is important to keep in mind a few tips:

-Keep lights over seedlings 1-2 inches at all times

-Water the tray for the soil blocks to absorb moisture form the bottom up

-Water the trays only when the tops of the soil blocks have dried out. Over watering can cause fungus and disease growth.

-Keep the lights on the plants for 12-14 hours every day with a minimum of 8 hours of darkness.

-Fertilize plants every 2-3 weeks with a good organic fertilizer product.

-Allow an oscillating fan to blow onto the plants occasionally to strengthen the root systems and prevent fungus growth.  This also helps with the hardening process before transplanting outside.

-Just before transplanting outside it is important to continue the hardening process.  Place your tray of plants outside everyday for an hour building the exposure of time over a week until ready to stay outside.

Seed Starting Dates

Cold Crops

Celery, Broccoli, Leeks, Green Onions, Perennial Herbs, Spinach, Swiss Chard, Kale, Cabbage, Peas and Lettuce can all be started and set under lights within the first 2 weeks in February.  I personally only start Broccoli and Celery and directly seed the others in the ground around the first week of March.

Root crops should be directly seeded into the ground.

Warm Crops

I start Tomatoes, Peppers, Basil, Stevia and Eggplant under lights around the first of March.  This may seem early, however, I transplant all my warm crops under walls o water mid April.  Just remember, you want to start most seeds 6 weeks before you put them outside.  So if you aren’t planning on using walls o water then you would start them the first of April.  All other warm crops are best directly seeded into the ground after the last frost date.  Enjoy starting your seeds this year and let me know how it turns out for you!  Happy Gardening!


Roasted Butternut Squash Salad with Warm Cider Dressing

Zemanta Related Posts Thumbnail

Warm, sweet, savory and crunchy!  This is a wonderful salad to serve during those cold fall and winter evenings!

Recipe

1 (1 1/2 pound) butternut squash, peeled and 3/4-inch diced

olive oil

1 tablespoon maple syrup

kosher salt and pepper

3 tablespoons dried cranberries

3/4 cup apple cider or apple juice

2 tablespoons cider vinegar

2 tablespoons minced shallots

2 tablespoons Dijon mustard

8 ounces spring mix

1/2 cup candied walnuts (saute in agave for 5-10 minutes)

3/4 cups Parmesan cheese

Preheat oven to 400 degrees.  Place the squash on a sheet pan.  Add 2 tablespoons olive oil, the maple syrup, 1 teaspoon salt, and 1/2 teaspoon fresh ground pepper and toss.  roast squash for 15-20 minutes, turning once, until tender.  Add the cranberries to the pan for the last 5 minutes.

While squash is roasting, combine apple cider, vinegar, and shallots in a small saucepan and bring to a boil over medium-high heat.  Cook for 6-8 minutes, until the cider is reduced to about 1/4 cup.  Off the heat, whisk in the mustard, 1/2 cup olive oil. 1 teaspoon salt and 1/2 teaspoon pepper.

Place spring mix in a large salad bowl and add the roasted squash mixture, the walnuts, and the grated Parmesan.  Spoon just enough vinaigrette over the salad to moisten, and toss well.  Serve immediately.

Creamy Potato Leek Soup

Potato Leek Soup with Crispy Shallots and ParmesanThis creamy vegetable soup is amazing!  I make it every Christmas for my family and everyone devours it!  Be sure to serve it with crispy shallots and Parmesan cheese!

Recipe

2 pounds Yukon Gold potatoes, peeled and cut into 3/4-inch chunks

4 cups chopped leeks, white and light green parts, cleaned of all sand (4 leeks)

1/4 cup good olive oil

Kosher salt and pepper

3 cups spinach

1/2 cup white wine

6-7 cups chicken stock

3/4 cup heavy cream

8 ounces cream fraiche

1/4 cup freshly grated Parmesan cheese

Crispy Shallots (recipe follows)

Preheat oven to 400 degrees.

Combine potatoes and leeks on a sheet pan in a single layer.  Add the olive oil, 1 teaspoon salt and 1/2 teaspoon pepper and toss to coat vegetables evenly.  Roast for 40 to 45 minutes, turning them with a spatula a few times during cooking, until very tender.  Add the spinach and toss to combine.  Roast for 5 more minutes, until spinach is wilted.  remove the pan fromthe oven and place over two burners.  Stir in the wine and 1 cup of the chicken stock and cook over low heat, scraping up any crispy bits from the pan.  Transfer vegetables and juices to a large dutch oven pot and puree with an immersion blender or blend in standard blender in batches with the remaining chicken stock.  Add the cream fraiche and heavy cream.  Check salt and pepper seasonings.  Serve with Parmesan and crispy shallots.

Crispy Shallots

1/2 cup olive oil

4 tablespoons butter

6 shallots peeled and sliced into thin rings

Heat oil and butter in pan.  Add shallots, stirring occasionally to evenly brown.  Remove from heat once crispy.

Christmas French Omelet

Christmas French OmleteEvery Christmas morning I make this omelet and blueberry pancakes!  I took the recipe from one of Barefoot Contessa’s cookbooks and added a few extra things.  You can add or take away to make it a family favorite.

French Omelet

1 tablespoon olive oil

3 slices thick cut bacon, cut into 1-inch peices

1 cup (i-inch diced) Yukon gold potatoes

Sea salt and fresh ground black pepper

6 extra-large eggs

3 tablespoons milk

1 tablespoon butter

1 tablespoon fresh chopped chives

1 cup shredded white sharp cheddar cheese

Preheat oven to 350 degrees.  Heat olive oil in a 10-inch ovenproof skillet over medium heat.  Add the bacon and cook for 3-5 minutes, stirring occasionally, until bacon has browned.  Take bacon out of pan and set aside on plate.  Drain out most of the bacon fat.

Place potatoes in the pan and sprinkle with salt and pepper.  Continue to cook over medium for 8-10 minutes, until very tender and browned, tossing occasionally to brown evenly.

Meanwhile, in a large bowl mix together the eggs, milk, 1/2 teaspoon salt and 1/4 teaspoon fresh ground pepper.  Add butter to the pan and turn off heat.  Pour the egg mixture into the pan and sprinkle bacon and cheddar cheese on top.  Bake in oven for 8-10 minutes or until eggs are set.  Sprinkle chives on top and serve hot.

Perfect Pumpkin Pie

Pumpkin PieThis recipes comes from Martha Stewart’s Pies and Tarts cookbook.  Its flavorful spice satin filling is a perfect combination with its flaky buttery pie crust!  Serve with whip cream or organic vanilla ice cream,

Perfect Pumpkin Pie

Pie Dough

2 1/2 cups all-purpose flour

1/4 cup sugar

1/4 teaspoon salt

1 cup cold butter, cut into cubes

2 large egg yolks

2-4 tablespoons ice water

In a food processor, pulse the flour, sugar and salt.  Add the butter piece by piece and pulse until it resembles coarse meal.  Add yolks and drizzle 2 tablespoons water evenly over mixture.  Pulse until dough just comes together, no more than 30 seconds.  If dough is to dry add another tablespoon water and pulse.  Divide dough in half, shaping each piece into a disk and wrap in plastic.  Chill for 1 hour or up to 2 days.  You can freeze it up 3 months.

On a lightly floured surface, roll out 1 disk of dough to a 13-inch round, 1/8-inch thick.   Fir into a 9-inch pie plate.  Trim excess dough flush with rim.  Pierce bottom of shell all over with a fork.  Chill until firm for 30 minutes.

On a floured surface roll out the scraps of dough.  Use a 1-inch leaf shaped-cutter, cut out 40 leaves from dough.  Transfer cutouts to a parchment-lined rimmed baking sheet.  Using a paring knife, etch veins in each leaf.  Chill until ready for use.

In a small bowl, whisk together 1 egg yolk and 1 tablespoon water; lightly brush one side of each leaf with egg wash.  Arrange leaves, slightly overlapping, around edge of crust, making sure they do not extend over edge, to prevent them from browning too quickly.  Lightly brush bottom of each leaf with egg wash as you work.  Chill for 30 minutes.

Preheat oven to 375 degrees.  Line pie shell with parchment; fill with pie weights or dried beans.  Bake for 20 minutes.  Carefully remove weights and parchment, and continue to bake until golden brown, about 10 minutes more.  Let cool on rack and keep oven on.

Pie Filling

1 cup packed light brown sugar

1 tablespoon cornstarch

1/2 teaspoon salt

1 teaspoon ginger

1 teaspoon cinnamon

1/4 teaspoon cloves

1 1/2 cups unsweetened pumpkin puree, canned or fresh

1 1/2 cups evaporated milk

In a large bowl, whisk together all ingredients.  Pour filling into partially cooked pie shell.  Place pie plate on a rimmed baking sheet; bake until edges are set but center is still slightly wobbly, 35-40 minutes.  Tranfer plate to a wire rack to cool completely.  Serve with whipped cream.