Peppermint Lip Balm

Peppermint Lip Balm
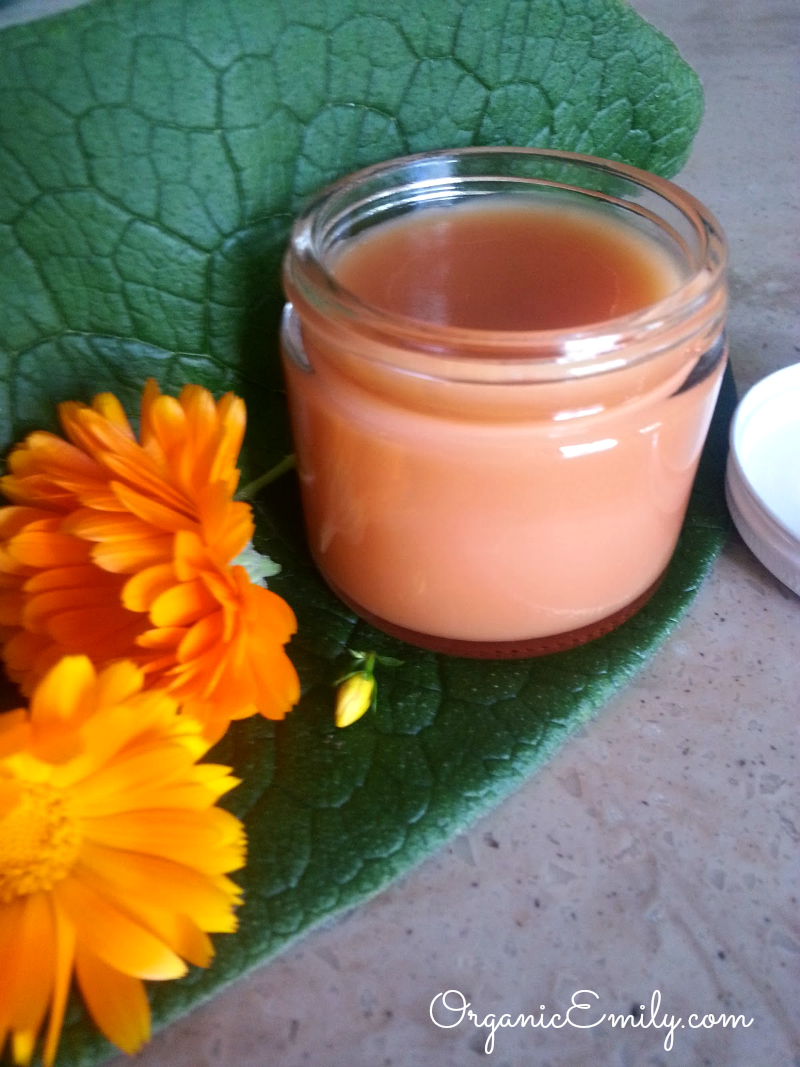
I have made my own lip balm for over a year now and struggled with finding a really good recipe.  My friend Cynthia Bee was sweet enough to share her recipe with me.  I love the smooth feel of this lip balm and the versatile options with different kinds of oils and butters.  I’ll give you the basic recipe and then break it down into exact proportions as I made it.  The place to get great product at an inexpensive price is www.wholesalesuppliesplus.com

Basic Recipe

40% liquid oil like castor, bubasu, almond or olive oil.  I recommend using a combination of two.  Castor oil is thicker and gives a nice sheen.

25% shea or mango butter

20% shredded beeswax

15% brittle butter like cocoa butter

How I did it:

Ingredients for Peppermint Lip Balm

1/4 cup olive oil

1/4 cup castor oil

1/4 cup + 1 tablespoon mango butter

1/4 cup shredded beeswax

3 tablespoon shredded cocoa butter

Pinch of colored mineral (optional)

1-2 drops essential oil of your choice for every .5 oz container

2 drops vitamin E oil added at the end to help preserve the lip balm

Melt all ingredients in a small sauce pan over low heat until all oils and beeswax is melted and combined.  Add the mineral color if using.  Use a medicine syringe to fill the small half ounce containers or lip balm tubes and then add the essential oil per container.  Let the balm set and then cover with lid.

Medicinal Skin Salve

Herbal Skin SalveThis salve is made from oil that has been infused with St. John’s Wort, Comfrey and Calendula herbs.  Each of these herbs has many wonderful skin healing properties including cuts, scrapes, stings, bruises, burns, sore muscles, diaper rash, cradle cap and more!  It is so simple to make and can be given as fabulous gifts too!  You can read about the specific medicinal properties of these herbs below.  If you like other herbs and want to use them instead, by all means do what works for you!  That is the beauty of this recipe!

comfrey

calendula

St. John’s Wort

Solar Infusing Oils for Homemade Skin Salve

From left to right: Calendula, Comfrey, St. John’s Wort

The first step is to infuse the oils!

Place fresh or dried herbs into pint or quart jars (depending on how much you want to make) and cover the herbs by an inch.

Cover the jars with lids and set out on a warm sunny porch or sunny window seal in the winter.

Allow to infuse in the sunlight for 2-4 weeks.

Dry herbs are best to use so that moisture doesn’t get into the oil.  Although, there are some herbs that need to be used fresh like the flowers and buds of St. John’s Wort.  If you do use fresh and see moisture develop at the top of the inside of the bottle just open it up and wipe it away with a clean paper towel.

Try making a double strength salve by straining  the first batch, placing the infused oil back into the jar and then adding more of the same herb starting the process all over again.

Salve Recipe

Once the oils are infused, measure the amount you have.

For every cup of oil you will add 1/4 cup shredded beeswax.

Melt the beeswax with the oil in a saucepan until melted.

Test the salve to make sure it is the consistency you want by spooning a little bit and placing into the freezer for a minute so it sets up fast.  If you want it more solid add more beeswax.  If you want it softer, add more oil.

Pour the liquid salve into a jar ( I get mine at Industrial Container and Supply).

Before it sets up ( and it will do it quickly) add 1 drop of vitamin E oil for every ounce.

Also add 2 drops essential oil for every ounce.  I like to use lavender and tea tree oil for their medicinal properties.  They compliment the salve very well!

The vitamin E oil will help preserve the salve longer as well as keeping it in the fridge too!

Clay Stamped Garden Markers

Clay garden markers 5

Here’s a project you can do with your kids!  Mine loved rolling the clay and stamping the letters!  These darling garden markers are reusable and weather proof because the words are stamped into the soft clay before placing them into the oven to dry.  Plan on making 18-20 garden markers with a 1lb. package of polymer clay.  We used our metal stampers from our Spoon Garden Marker project, but you can also use rubber stamps too!  The process is very simple!

You will need:

1lb. Polymer clay

Knife

Rolling pin

Metal or Rubber stamps

Jelly roll pan lined with parchment paper

275 degree oven

Clay garden markers 1

Cut the clay to make 1 inch clay balls.  Roll the balls into 5 inch logs.

Clay garden markers 2

Roll the log flat at a 1/4 inch thickness.  Cut the bottom at an angle for the marker to easily penetrate the soil.

Clay garden markers 3

Stamp the clay with metal or rubber stampers with what you plan on growing!

Clay garden markers 4

Place the soft clay markers on a jelly roll pan lined with parchment paper.  Bake at 275 degrees for 15 minutes or until the clay stiffens.  Let cool and place where needed!

DIY Garden Markers

Garden Marker Spoon 1

These durable garden markers were fun to make and not as hard as I thought they would be.  I saw this idea online and wanted to make them for my garden!  All it took was a few tools and a little muscle to pound the spoons flat.  Great for working out any aggression! 🙂  And I like that the words won’t wash off with time and weathering.

Supplies

Tools for Garden Marker Spoons

All you will need is:

  • Metal Stampers (I got mine off amazon for $15)
  • Old Spoons (second hand stores are great for this!)
  • Hammer
  • Permanent Marker (to fill in the stamped words)
  • Hard surface to hammer the spoons on ( I used an old paver)


Directions

  1. Hammer the spoons flat on a hard surface that won’t break.
  2. Stamp your spoons with the names of veggies and herbs you are growing in your garden with hammer.
  3. Color in the words with a permanent marker an wipe off leaving the words darkened and easier to see.
  4. Place in garden where needed!


Growing and Using Medicinal Herbs: Comfrey

Comfrey Plant

Comfrey is a wonderful herb with  multiple benefits!  The plant is very easy to grow and can be harvested multiple times a season.  It grows well in full sun and well draining soil.  One of my favorite comfrey products I use is a salve called Dr. Christopher’s Complete Bone and Tissue for all my physical aliments!  It contains comfrey and other herbs.  It is simply magical!  As a fitness instructor for over 10 years who teaches multiple classes a week my body has begun to… well let’s say get a little older and over used so to speak.  I have a bulging lower disc in my spine, knee pain and a weak rotator cuff.  Whenever anything starts to flare up I put the salve on a few times a day and within a couple days I am back to normal again!  I cannot say enough about comfrey!

Medical Benefits of Comfrey

  • Comfrey is good for fracture healing and bone lesions.
  • Comfrey is beneficial for treatment of muscle tears, sprains, strains, and dislocations.
  • Comfrey helps in arthritic conditions of bursitis, tendinitis, and torticollis.
  • Comfrey treats arthritis such as rheumatoid arthritis and osteoarthritis.
  • Comfrey is good for treating bunions and deformities of extremities.
  • Comfrey helps in treating intervertebral disc lesions and herniated discs.
  • Comfrey is good for circulatory system and improves poor circulation and varices.
  • Comfrey treats skin deformities like minor wounds, minor burns, fistulas, and psoriasis.
  • There are millions of comfrey natural products available in the market, the most prominent of which is comfrey gel which helps in treatment of some types of eczema, cracks in breasts, and varicose ulcers
  • For more info go here

Harvesting Comfrey

  • Here is an excellent video on how to harvest comfrey!

There is controversy over whether comfrey should be ingested or not.  Studies have shown that comfrey taken internally can be dangerous due to it’s high levels of alkaloids, potentially harming the liver.  However, the studies are a bit misleading in my opinion.  They do show that the alkaloids could be dangerous, but that is because very large amounts were taken internally.  More so than what the average person would normally ingest, however it is important to use caution.  I know many people who have taken it internally and are just fine.

Dried Comfrey

You can make a basic salve recipe with the dried comfrey leaves and roots.  Anytime you use a root over the leaf or flower of the plant it will always have stronger constituents.

Comfrey Oil

 The first step in making your own medicinal salve is to make a solar infused herb oil.  This can even be done with herbs for cooking.  Fill a clean and dry wide mouth jar with dried herb leaves or roots.  Cover with 2 inches of good olive oil.  Cover tightly and allow to sit in a warm sunny spot for 2-4 weeks.  The longer you allow it to sit the stronger it will become.  You might expect the oils to go rancid, however as long as the herbs are infusing the oils they won’t due to the antioxidant properties found naturally in plants.

Straining Herbs 1

 Strain the herbs through a sieve after the oil has been infused.

Straining Herbs 2

Strain further into a cheese cloth or piece of muslin.  Be sure to squeeze the last bits of oil from the drained herbs into the bowl.

Homemade Salve

Now the salve is ready to be made!


Basic Salve Recipe


For each cup of infused herb oil, add 1/4 cup (finely chopped or shredded) beeswax.  Heat the oil and beeswax together over very low heat, stirring occasionally, until the beeswax has melted.


To ensure the salve is the thickness you desire, place 1 tablespoon of the mixture onto a spoon and put in the freezer for a minute or two.  Then check for firmness of the salve.  Add more beeswax if you desire a more firm ointment.  For a softer salve add more oil.


Once the mixture is the consistency you want pour immediately into small glass jars or tins.  Be careful the oil is extremely hot!  I get me supplies from here.


Store salve in a cool, dark place, where it will keep for several months.  Add essential oils to enhance aroma and medicinal purposes.


DIY Rose Water

Old Fashioned Rose

It’s that time of year I yearn for throughout the winter months when the roses and the peonies bloom!  Rosa Rugosa is a beautiful rose that produces rose hips, or fruit from the rose after blooming.  I intentionally purchased this particular shrub because of the color and the availability to use the hips for jelly and other purposes.  Rose hips are very high in Vitamin C, in fact they contain 50% more than oranges!  Rose hips are also used in tea to relieve constipation.  More on the benefits and uses of rose hips later when I can harvest them!

While the blooms are big and beautiful I like to harvest a few cups to make rose water!  I use rose water as a natural toner for my face and body after cleansing.  There are many other reasons why a person would use it, here are just a few:

  • Rose water is a gentle astringent safe enough for acne prone, oily or aging skin by reducing inflammation and redness caused by enlarged capillaries.  It has also been tested to bring the Ph levels back to normal so the oil glands don’t have to over produce causing further problems.
  • Rose water used as a warm tea infusion for the bath can help reduce general stress but also abdominal stress, specifically for those who suffer from bladder infections.
  • When sprayed on hair it has been known to increase blood flow to the scalp to nourish and strengthen hair follicles and prevent hair loss.
  • Rose water is also high in Vitamin C, A, D B3 and E.  Improving the overall health of skin and hair.


Rose Petals


How To Make Your Own Rose Water

  • Gather 1 cup packed fresh organic rose water.
  • Wash with purified water to clean any insects or dirt off.
  • Bring 2 cups distilled or purified water to a boil.


Steeping Rose Petals

  • Take the pan away from the heat and place the rose petals inside.  Cover with a lid for 30 minutes allowing the rose petals to steep and the water to take on the color and oils of the roses.


Straining Rose Petals

  • Strain the roses through a sieve and squeeze all the remaining water and color out of the petals.
  • Strain a second time through muslin or cheese cloth.


Rose Water Bottle

  • Store cooled rose water in a spray bottle.
  • Keep in the fridge for up to 1 week or place a few drops of lavender essential oil to help preserve longer.
  • Other natural additives may be 3-4 drops vegetable glycerin for hydration, 1/2 tsp almond oil or other favorite essential oil.