Beneficial Insect and Butterfly Loving Plants

Wegelia

I love to be in nature!  Whether I am in my own garden growing something beautiful and delicious or up hiking in the mountains I always feel a sense of peace!  Being in nature is my therapy to get me through the stress of life!   There is a spiritual side to nature that brings a feeling of reverence and thanksgiving for the Creator of all things as each multiplies and replenishes this earth.  Each insect, animal, shrub, plant and tree all have a purpose.   Some of those purposes include pollination of many plants.  In fact 60% of our food has to be pollinated by insects.  That’s a lot!  The honeybee is a big contributor to pollinating the food we eat.  Many honey bees have been dying off for reasons no one quite understands.   Recently there has been a great movement happening!  People are keeping honeybees in their own backyards in the cities and suburban communities!  I have been keeping bees for 2 years now and love it!  There is a lot to know and understand, but once I got the hang of it, it really has become very low maintenance and thoroughly enjoyable!  I plant lot’s of beneficial insect loving plants!  They not only beautify my yard and home, but also provide the necessary pollen and nectar for my bees as well as wild beneficial insects too!  Here are some I like to grow, both perennial and annual!

Bee balm

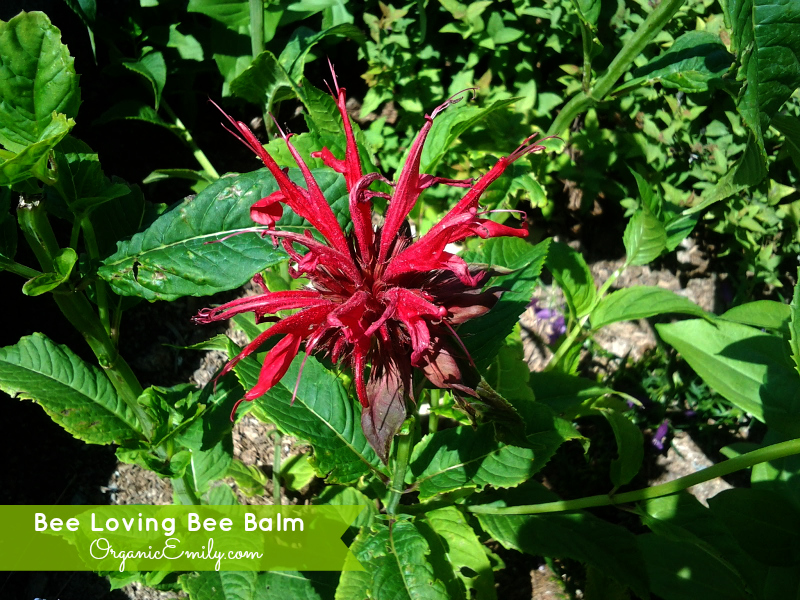
Bee balm is  from the mint family and is a perennial.  It’s not as invasive, but still can spread.  The flower is a a favorite to the humming bird and also edible for humans!  Try throwing a few blooms into a salad!

Green Onion in Bloom

Bees love onion blooms!  Onions that bloom the second season are great for saving seeds!  This honey bee was hard at work collecting pollen as I harvested my chamomile!

blue perrenial salvia

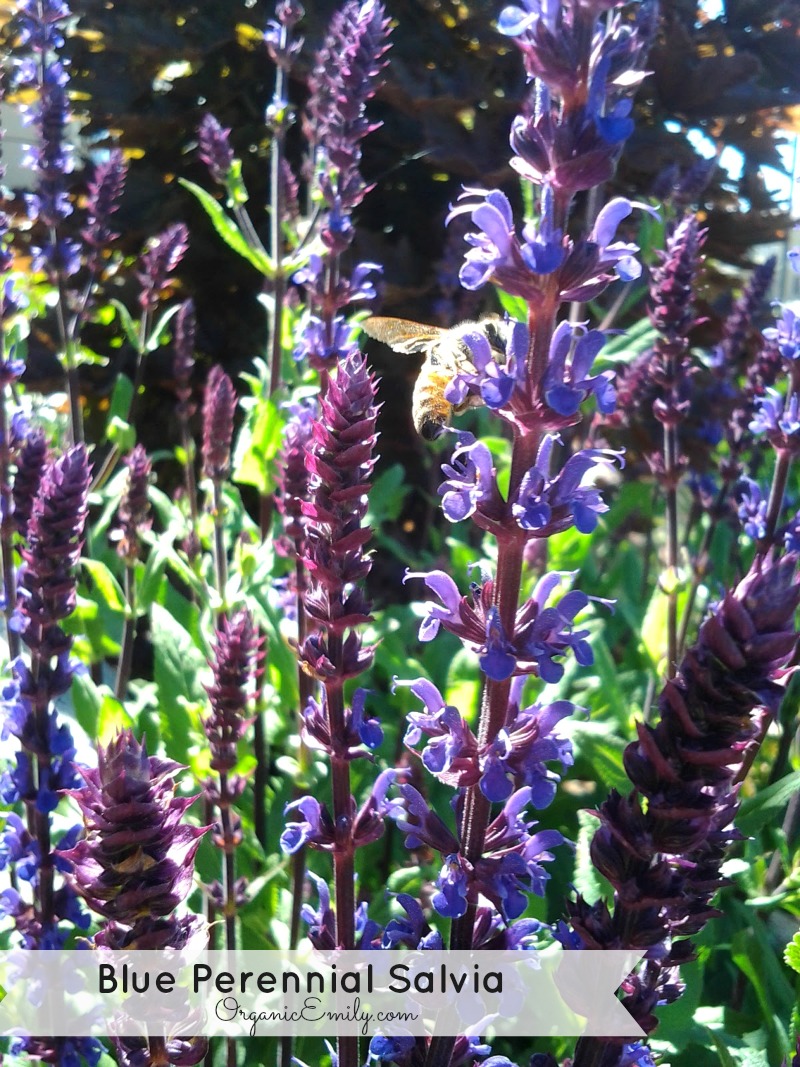
Blue Salvia is a beautiful June perennial.  Cut back the dead after it blooms and it will flower again!

yarrow

Yarrow attracts many types of beneficial insects and blooms all summer long!

Cosmos

Cosmos is an annual that self seeds very well!  It comes in many colors and both tall and short varieties.  Honeybees love this one too!

Echinacea

Echinacea is a perennial that gets bigger every year!  The leaves, flowers and roots can be harvested for medicinal purposes!

Blue Sage

Blue sage, an edible herb used for stuffing on Thanksgiving day at our house!  Can you see the honeybee?

English Thyme

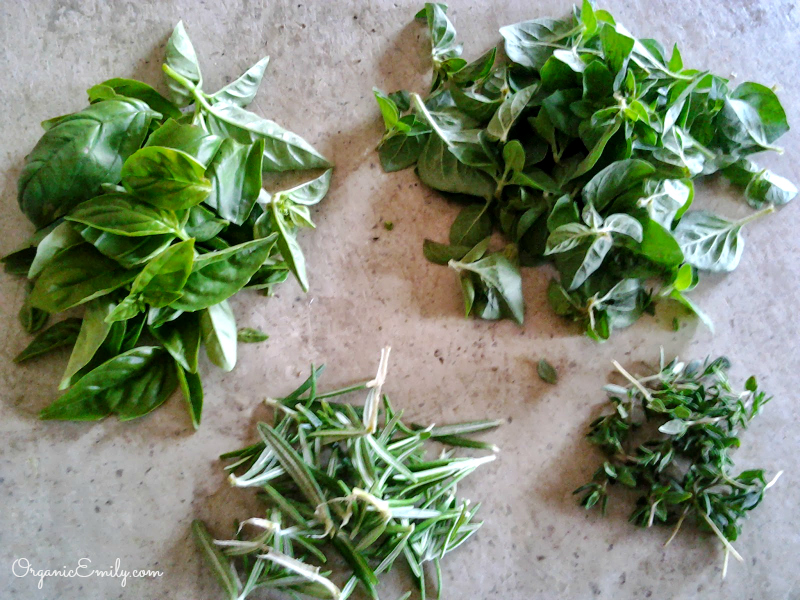
Another favorite herb for both bees and humans, but especially bees if allowed to flower!

Horehound

This low growing perennial is covered in bees in the spring when it blooms!  It can also be used to make homemade cough syrup!

Lavender

Lavender is a favorite of honey bees.  So is Russian Sage, both look similar but I grow the lavender to harvest for myself!

ground cover 1

Wooly Thyme is a great perennial ground cover to help prevent weeds and the honeybees love it too!

Oange Zinnia

Zinnias come in all shapes, colors and sizes!  Many insects are attracted to this beautiful annual, like butterflies, honey bees and humming birds!

St. John's Wort

Honey bees are all over this beautiful perennial towards the end of June!  I’ll be harvesting some of my blooms for making a skin healing salve soon!

These are just a few  plants that benefit our much needed insects to do the hard work of pollination!  Other plants  not shown are Blue Beard, Butterfly Bush, Coreopsis, Black Eyed Susan (Rebekiah), Chrysanthemums, Yarrow, Red Clover and many more!  Grow your own beautiful plants to help the honey bees and our local farms and neighborhood gardens!

DIY Rose Water

Old Fashioned Rose

It’s that time of year I yearn for throughout the winter months when the roses and the peonies bloom!  Rosa Rugosa is a beautiful rose that produces rose hips, or fruit from the rose after blooming.  I intentionally purchased this particular shrub because of the color and the availability to use the hips for jelly and other purposes.  Rose hips are very high in Vitamin C, in fact they contain 50% more than oranges!  Rose hips are also used in tea to relieve constipation.  More on the benefits and uses of rose hips later when I can harvest them!

While the blooms are big and beautiful I like to harvest a few cups to make rose water!  I use rose water as a natural toner for my face and body after cleansing.  There are many other reasons why a person would use it, here are just a few:

  • Rose water is a gentle astringent safe enough for acne prone, oily or aging skin by reducing inflammation and redness caused by enlarged capillaries.  It has also been tested to bring the Ph levels back to normal so the oil glands don’t have to over produce causing further problems.
  • Rose water used as a warm tea infusion for the bath can help reduce general stress but also abdominal stress, specifically for those who suffer from bladder infections.
  • When sprayed on hair it has been known to increase blood flow to the scalp to nourish and strengthen hair follicles and prevent hair loss.
  • Rose water is also high in Vitamin C, A, D B3 and E.  Improving the overall health of skin and hair.


Rose Petals


How To Make Your Own Rose Water

  • Gather 1 cup packed fresh organic rose water.
  • Wash with purified water to clean any insects or dirt off.
  • Bring 2 cups distilled or purified water to a boil.


Steeping Rose Petals

  • Take the pan away from the heat and place the rose petals inside.  Cover with a lid for 30 minutes allowing the rose petals to steep and the water to take on the color and oils of the roses.


Straining Rose Petals

  • Strain the roses through a sieve and squeeze all the remaining water and color out of the petals.
  • Strain a second time through muslin or cheese cloth.


Rose Water Bottle

  • Store cooled rose water in a spray bottle.
  • Keep in the fridge for up to 1 week or place a few drops of lavender essential oil to help preserve longer.
  • Other natural additives may be 3-4 drops vegetable glycerin for hydration, 1/2 tsp almond oil or other favorite essential oil.


Early June Bloomers

Check out what’s blooming in my yard this week!

Blue Perennial Salvia

A Honey Bee favorite!  Blooms late spring early summer just before lavender!  Cut it back once it’s finished blooming to give it another chance to bloom a second time!

Daylilies

Day lilies add bright vibrant color to the garden blooming all summer long!

Jackmanni Clematis

This beautiful Clematis blooms all June long right by my back door!   Give it a big enough trellis to climb and you will see blooms everywhere!

Dianthus

A pretty vibrant pink perennial that grows low to the ground.  Great for borders and edges!

blue sage

Blue sage is another bee loving plant when in bloom!  This medium size perennial is beautiful and aromatic!

Chives

Another perennial herb that can be placed in the flower beds with it’s pretty purple blossoms!  Be sure to pluck off the flowers once they dry, unless you want to spread new chive plants all over for next year!

Corabell's

I love corabell’s!  Their long blossoms make for beautiful bursts of color in a spring bouquet!  The foliage is low growing with taller wispy blooms.  They do best in part sun/shade.

ground cover 1

My yard is filled with different kinds of water-wise perennial ground cover to keep the weeds at bay !  I love this one because the bees benefit too!  Just be sure to watch your step!

English Daisey's

These little plants create a nice border bursting with color all spring and early summer long!  They may even last a little longer in shadier spots!

Lavender

Some of my many lavender plants are getting ready to bloom and will be soon covered with honeybees!  I’ll be harvesting the blossoms for may purposes!

English Thyme

Thyme!  One of my favorite herbs!  The bees love this one too since I didn’t cut it back before it flowered!

Mock Orange

This lovely shrub can get up to 6 feet tall!  It is known for it’s lovely citrus scented blooms and sits on the east side of the workshop out in back!

Old Fashioned Rose

These old fashioned roses have a divine scent!  They also provide rose hips high in vitamin C after the blossoms produce!

Pin Cushion Flower

A dainty perennial that blooms all summer long!  Low to medium growing in height.

Pink Peony

One of many peonies in my garden!  This is the first one to bloom in my yard.  This year she had 24 blooms!

Salmon Pink Poppy

Have you seen a prettier Poppy?!  I need more of these!

Wegelia

Another bee loving shrub with blossoms I wish would last all summer long!

yarrow

Yarrow’s  bright and cheery flowers bloom all summer long!  Not only does it add color to the garden but it also has medicinal purposes too!  Look for my post on medicinal purposes for yarrow soon!

Growing and Using Herbs: Peppermint and Lemon Balm

Peppmint and Lemon Balm

I grow my peppermint, spearmint and lemon Balm in pots because they are very invasive perennials!  These are all apart of the same family and have many benefits!  Let’s talk about just a few.

Peppermint

  • Mint is an excellent pest control when grown around the garden and home.  It deters mice, ants,  flies, roaches and moths.  It also attracts beneficial insects like honey bees and other pollinators when allowed to flower.
  • Peppermint has many medicinal properties as well.  It stimulates the digestive system relieving cramps, gas, bloating, nausea, diarrhea and other stomach problems.  It is also known to have astringent, antiseptic, antibiotic, antimicrobial components and is great for using on cuts, burns and other wounds.  I use it religiously for headaches!  Whenever I feel the tension coming on I will apply both peppermint and lavender essential oils to my neck and shoulders and it goes away in just a matter of a few minutes!  If you don’t have the essential oils, but grow it in your yard or home try mashing up a few leaves to release their oils, add it to a little bit of olive oil and massage it into  the area needed.  The next time you have a cold try drinking some peppermint tea to help relive congestion.


Lemon Balm (Melissa)

  • Lemon Balm, a pollinator attractor, has been known to be a calming herb, both for the nervous system and digestive system.  It was used as far back as the Middle Ages to relieve stress, promote sleep, improve appetite, ease discomfort associated with indigestion and treat cold sores.   I like to make a calming tea using lemon balm with other herbs like chamomile, calendula and peppermint.


Drying Herbs

Harvesting and Drying Herbs

Before my peppermint and lemon balm get to big and their leaves become smaller just before flowering, I harvest big bunches for drying and using later.  Cut the herbs back towards the ground leaving a few inches of the plant.  Don’t worry they will come back with a vengeance and you can do it all over again in another few weeks!   From there you can rinse any dirt or bugs off the plants and dry them one of 3ways.  First, you can do it the way I did here in the picture.  Tie a rubber band around a bunch and then thread a piece of twine through hooking it to a hanger.  Allow to dry out of direct sunlight, hanging upside down for a week or two.  Second, you can take the leaves off the stems and dry in a dehydrator.  It’s certainly the fastest way to dry anything!  Third, get a screened frame and allow the herbs to dry on top under the shade of a tree, again out of direct sunlight.  Once the herbs are completely dry store in a cool dark place, preferably in a glass jar.


Fruit Salad

For a heavenly addition to any fruit salad try adding chopped fresh mint, lemon balm, basil or even lemon verbena!  You can do what I do and make a simple raw syrup to put over a big bowl of freshly chopped fruit.

2 limes zested and juiced

2 tablespoons raw honey

1/4 cup chopped peppermint or 2 tablespoons chopped lemon balm, basil or lemon verbena


Growing and Using Herbs: Dill

Growing and Using Herbs: Dill

Right now in my garden, dill is at it’s peak of foliage just before going  to flower and seed in the next few weeks!   These tender leaves make a delicious and refreshing addition to many dishes including eggs, salads and fish.  Once it begins to flower, it adds a charming and whimsical addition to the garden, attracting beneficial insects and deters some of the bad bugs!

Companion Planting with Dill

In any vegetable garden, dill can benefit the members of the cabbage family, onion family, lettuce, corn, and cucumbers.  Avoid planting it with carrots and tomatoes. Many of the same insects that benefit vegetables will also benefit flowers through pollination.   Dill attracts wasps, hoverflies, tomato horn worms and honeybees.  Dill also repels aphids, mites, cabbage loopers and squash bugs. It is also one of the few annuals that can be planted with fennel which should be avoided by almost everything else.  Next year I plan on planting dill around my plum tree, currants and honeysuckle to keep the aphids away!

How to Plant Dill

Dill is probably one of the easiest things to grow!  It is another water-wise plant that needs full sun and well draining soil.   Add a little organic matter like compost to your soil to help with keeping the soil lose and free from compaction.  Dill germinates well in soil that is 60`-70` and can be planted from mid spring to early summer.  It can grow in 6 hours of sun, but will do well with more.  Dill self seeds, so you can expect it to return next year provided the soil conditions are the same.  Plant dill next to flowers with a variety of color.  Its light green stem and yellowish green flowers contrast nicely with flowers that produce dark petals, making the garden jump in color. If garden aesthetics are what you do best, sprinkle dill seeds in a variety of locations throughout your flower garden. The bouquet of flowers accentuated by sprigs of green leaves allow the vibrant colors of the flowers to stand out.  Dill not only looks beautiful but also adds a lovely fragrance to the garden.

Harvesting Dill

The best time to harvest dill is when the weather is cool or in the morning just like other herbs.  Cut the flower heads after they begin to go to seed, but be sure to let some complete the life cycle to reseed the ground or save for the following year to be placed in an intentional part of your yard.  A dill harvest is another advantage of growing this herb.  If you enjoy making pickles, grow plenty of dill. For each jar of dill pickles, at least two flower heads and several sprigs are necessary.  Dill can be planted in mid spring to early summer.   I recommend planting both times so that if you do like to pickle cucumbers, you’ll have some around for when the cucumbers are ready.

I love the flavor of dill!  Here are just a few of my favorite recipes!  Next time you make a green salad, throw some dill in, you will be delighted!


Salmon Pasta Salad with a Feta, Dill and Lemon Dressing

Salmon Orzo Pasta with a Feta, Dill and Lemon Dressing

6 cups water
1 pound asparagus, trimmed and cut into 3-inch pieces
1 cup uncooked orzo (rice shaped pasta)
1 (1 1/4 pound) skinless salmon fillet
olive oil
1/4 teaspoon salt
1/4 teaspoon freshly ground pepper
1/2 purple onion, chopped
1/2 cup feta cheese
1 tablespoon freshly chopped dill
3 tablespoons freshly squeezed lemon juice (about 1 lemon)
2-3 tablespoons olive oil
salt and pepper to taste
Bring 6 cups of water to a boil.  Add the asparagus and cook for 3 minutes.  Remove from the pan with a slotted spoon and place in large bowl.  Add the pasta to the water and cook according to directions on package.  In the meantime, drizzle salmon with a little bit of olive oil and sprinkle with salt and pepper.  Broil  for 5 minutes or until salmon is flaky.  Set aside once finished.  Add chopped onions, feta cheese, dill, lemon juice, olive oil, and salt and pepper to taste into the asparagus.  Add fish and drained pasta.  Mix thoroughly. Serve immediately.  Recipe from Cooking Light, Fresh Food Fast. pg. 105
Eggs, Lemon, Dill and Toast

Fresh Eggs and Greens from the Garden with Whole Grain Organic Toast and Lemon Dill Dressing

Garden Egg Sandwich
1-2 pieces of good whole grain bread (I like to make my own or use Dave’s Organic Bread from Costco)
Fresh greens
Fresh egg, cooked to your liking
Lemon dill vinaigrette (recipe below)
2 teaspoons fresh Parmesan (optional)
Lemon Dill Vinaigrette
1 lemon zested and juiced
1 tablespoon fresh chopped dill
1/3 cup olive oil
Salt and pepper to taste

Old Fashioned Potato Salad

When it comes to potato salads, I haven’t found very many worthy of putting into my mouth.  I’m just not a fan!  However, I did try this one from Barefoot Contessa and fell in love!  It not only taste fabulous but is pretty too!

3 pounds small red potatoes
kosher salt
1 cup good mayo
1/4 cup buttermilk
2 tablespoons Dijon mustard
2 tablespoons whole-grain mustard
1/2 cup chopped fresh dill
freshly ground black pepper
1/2 cup medium-diced celery
1/2 cup small-diced red onion
Place the potatoes and 2 tablespoons salt in a large pot of water.  Bring the water to a boil, then lower the heat and simmer for 10 to 15 minutes, until the potatoes are barely tender when pierced with a knife.  Drain potatoes in a colander, then place the colander with the potatoes over the empty pot off the heat and cover with a clean, dry kitchen towel.  Leave the potatoes to steam for 15 to 20 minutes, until tender but firm.
Meanwhile, in a small bowl, whisk together the mayo, buttermilk, Dijon and whole-grain mustards, dill, 1 teaspoon salt and 1 teaspoon pepper.  Set aside.   When the potatoes are cool enough to handle, cut them into quarters or halves, depending on their size.  Place the cut potatoes in a large bowl and pour the dressing over them.  Add the celery and red onion.  Refrigerate for a few hours or up to a day to allow the flavors to blend.

Healthy Chocolate Chip Pumpkin Cookies

Healthy Chocolate Chip Pumpkin Cookies

Recipe:

These sweet cookies are packed with lots of good stuff!  They didn’t even make it to a pretty plate before they were gone!

1/2 cup pumpkin puree

1 egg

1/4 cup organic canola oil

1 t. vanilla

3/4 cups whole wheat flour

1 1/2 cups rolled oats

1/4 cup organic sugar

1/4 cup organic brown sugar

1 1/2 t. cinnamon

1/2 t. baking soda

1/2 t. salt

1/4 t. baking powder

1/4 t. nutmeg

1/4 t. cloves

1/2 cup chocolate chips

1/2 cup dried cranberries

Heat the oven to 350`.  Grease a jelly roll pan and set aside.  In a large bowl mix together the first 4 ingredients.  In another medium bowl mix together the flour, oats, sugar, baking powder, soda , salt and spices.  Add the wet and dry ingredients together until just incorporated.  Fold in the chocolate chips and cranberries.  Bake for 12-14 minutes.

Growing and Using Herbs: Oregano

Fresh Greek Oregano

Oregano can be grown in any flower bed or vegetable garden!  It’s beautiful green leaves have a spicy fragrance and adds depth and savor to any dish!  I like Greek Oregano, it tends to have a little more heat and flavor than other varieties.  This week I harvested an entire plant before it flowered.  It will come back with a vengeance and I’ll be able to harvest again or let it flower so the bees can benefit from the plant too!  Oregano has many health benefits and is used for many purposes.  It’s  full of vitamin K, antioxidants and minerals.  It is also a natural antibiotic!

Oregano 2

With all the oregano I harvested I decided to dry it all!  There are a few ways to dry herbs.  They can be strung up and hung upside down to dry by air.  They can be dried outside on a screen under a shady tree.  Or they can be dried in a dehydrator.  First pulling off the leaves from the stems and then placing them on a dehydrator tray.  As you can see I dried them in the dehydrator.  I first pulled all the leaves from the stems and then placed them on a tray to be dried.  I had enough to fill 8 large trays.   I set my dehydrator on the lowest setting (about 95`) and dried the oregano for 24 hours.

Dried Oregano

My oregano is stored in a half gallon glass jar, kept in a cool, dark room to maintain it’s potency.  We won’t use all this especially if I harvest again this year or even next year.  So I plan to divide the oregano out and put into smaller 4 oz. jars, add cute labels and give them as homemade Christmas gifts!   There are so many things we can do with herbs!  Here are a few recipes we enjoy at our house!

Fresh Herb Spaghetti

Fresh Herb Spaghetti

Olive oil for cooking

1 pound ground organic turkey

1 large yellow onion

3-4 cloves garlic, chopped

1 pound chopped baby mushrooms

Kosher salt and pepper

1 teaspoon Italian herb seasoning

2 bottles or cans (28 oz. each) crushed tomatoes

1 package cooked whole wheat pasta spaghetti noodles

1/2 cup mixed fresh chopped herbs, like rosemary, oregano, thyme and basil

Fresh Cut Herbs

Heat oil in a large dutch oven and add ground turkey.  Add the onions and cook until lightly browned.  Add the garlic, mushrooms, kosher salt and pepper and Italian seasoning and continue to cook for a few minutes longer.  Add the crushed tomatoes and allow to simmer on medium low for 20 minutes.  In the meantime cook the noodles according to the directions on the package.  Strain the noodles and add to the pot of sauce.  Add the fresh herbs at the end and cook for just another minute or two.  Serve with fresh Parmesan or shredded mozzarella!


White Bean Panzanella

White Bean Panzanella

This savory salad is one of my favorites!  Made with homemade sourdough croutons, white beans and fresh herbs, it is a meal all by itself!  Perfect for a spring or summer time gathering!

1 loaf of sourdough bread, cut into bite size cubes

olive oil

kosher salt and pepper

Place the cubed bread on a rimmed baking sheet.  Drizzle olive oil and sprinkle salt and pepper over the bread.  Toss gently with hands.  Bake at 350` for about 20 minutes until golden.  Allow to cool.

In a large bowl place:

6-8 ounces of organic spring mix

1 1/2 pounds chopped tomatoes

1 can white beans, drained and rinsed

1 small red onion, halved and sliced very thin

3 tablespoons fresh chopped basil

2 tablespoons fresh chopped oregano

1/2 cup shaved Parmesan cheese

Top with cooked croutons and dress with an Italian or balsamic vinaigrette just before serving.


Harvesting and Using Broccoli

harvesting and Using Broccoli

I love broccoli!  It’s so easy to grow and is such a healthy vegetable!  This year I started my seeds under lights in February and planted them in the ground the second week in March.  I haven’t had problems with pests thankfully.  But, if you have problems with cabbage worms or other bugs, cover the starts with a fabric row cover thin enough to allow light and water penetration in.  Make sure you bury the edges in the ground around the plants so the little white butterflies can’t lay their eggs on them!  If you don’t have fabric row covers or didn’t get around to putting them on in time, you can use a garlic spray to get rid of them.  Here’s the recipe:

Homemade Garlic Bug Spray

Blend 2-3 bulbs garlic in a bit of water
Add 2 cups water,
2 tablespoons plant based liquid dish soap,
1 teaspoon cayenne pepper and allow to sit over night.
Strain through a cheese cloth and put in sprayer and spray the plant thoroughly. This recipe also works well for wireworms, ants, aphids, slugs, cutworms, and caterpillars.
  Broccoli has so many health benefits!  I am grateful my kids will eat it by itself, lightly steamed.  However, if you or your loved ones don’t appreciate as much as we do, try slipping it into salads or soups for added nutrition.  Check out the 9 Benefits of Broccoli  I love that it is an alkaline food, helps prevent cancer, reduces cholesterol, and detoxes the body!

Harvesting broccoli is very simple. Once the head of the plant has grown to a medium – large size (before the head becomes loose and starts to flower) cut it off with a large kitchen knife. Notice in the picture there are little florets next to where I cut off the big one in the middle. You can let these get a little bigger and cut them off for use later or harvest now.

Broccoli Going to Seed

Here is a head I didn’t catch in time, so I will let it go to seed and save them for starting seeds next year or in the fall. This is Waltham broccoli (an excellent variety for Utah).

Broccoli 4

Broccoli Recipes

Vegan Creamy Broccoli Soup

Vegan Creamy Broccoli Soup

It’s hard to miss the cheese in this one!  It’s so good!

6 cups vegetable stock

1 cup cashews

1 medium onion, chopped

1 celery stalk, chopped

1 large carrot, chopped

2 garlic clove, chopped

1 red pepper, chopped

2 medium potatoes, peeled and chopped to 1 inch size cubes

1 large head of broccoli, chopped (about 4 cups)

2 teaspoons dried thyme

Salt and pepper to taste

Puree 1 cup of vegetable stock with the cashews in a blender until smooth.  Set aside.

In a large dutch oven saute the onion, celery and carrot over medium heat in 1 cup vegetable broth for about 5minutes, until tender crisp.  Add garlic, red pepper and potatoes.  Cook for a few more minutes.  Add the remaining 4 cups of broth and broccoli, thyme and salt and pepper.  Bring to a boil over high heat.  Cover and turn heat down to medium low and let simmer until the broccoli and potatoes are soft, about 10 minutes.  Add the cashew cream to soup and stir until mixed.  Remove from pot and puree half the soup in small batches.  You can leave some chunky or puree it all.  Serve with a crusty bread and salad!  Recipe from Forks over Knives Cookbook


Broccoli Pear & Feta Salad

Broccoli, Pear & Feta Salad

This delicious invention came from a last minute need to put together an extra salad for a family gathering.  I have to say I was pretty proud of myself!  This was so good!  From the garden: broccoli and mint

2 Tablespoons agave

2 cups pecans halves

Coat the pecans with agave in a medium size skillet on medium-low heat.  Constantly stir for 5-10 minutes until the pecans are caramelized and slightly darkened.  Let cool.

In a bowl mix together:

1-2 heads fresh broccoli chopped into bite size pieces

4 pears chopped

1 cup crumbled feta cheese


Mint-Pepper Dressing:

In a blender puree:

1 cup peppermint or spearmint leaves

Juice of 2 lemons

4 cloves garlic

1 teaspoon peppercorns

1 teaspoon salt

1 cup olive oil

2 tablespoons agave

Pour just enough dressing to coat the salad and serve!  Save the rest of the dressing in an airtight container for up to 2 weeks.

Growing and Using Herbs: Parsley

This week we are eating spinach, radishes, chives and parsley out of the garden!  Look for the recipes below using them all!  Parsley is more than just a garnish for your plate!  It may surprise you all the benefits you can get from this wonderful herb!  Here are just a few!
  • Parsley is rich in many vital vitamins, including Vitamin C,  B 12, K and A. This means parsley keeps your immune system strong, tones your bones and heals the nervous system.  It is high in chlorophyll and helps to freshen breath from the inside out.
  • It helps flush out excess fluid from the body, thus supporting kidney function. However, the herb contains oxalates, which can cause problems for those with existing kidney and gall bladder problems.
  • Regular use of parsley can help control your blood pressure. The folic acid in this herb is like a tonic for your heart.
  • Parsley essential oil, when massaged into the scalp, may reduce hair loss.
  • Use parsley daily, and you’ll feel relief from joint pain. That’s because the herb has anti-inflammatory properties.
  • Parsley tea relaxes stiff muscles and encourages digestion.
  • Studies indicate that parsley—especially its essential oil—may have a role in inhibiting cancerous tumors. In fact, scientists have billed it a ‘chemoprotective’ food.

Good Morning Green Smoothie!

This smoothie recipe is so refreshing and packed full of vitamins and minerals!  even my kids will drink it!  In a blender, mix together the following ingredients in this order:
1 cup water
1-2 tablespoons chia seeds
1 banana
Juice of 1 lemon
Juice of 1 lime
1-inch piece of fresh ginger
1 cucumber
1 carrot
1 celery stalk
1/2 cup applesauce or 1 apple
1 bunch parsley (about 1/2 cup)
2 cups packed fresh spinach
1 cup frozen pineapple

Roasted Spring Vegetables with Curried Chicken and Brown Rice on a Bed of Fresh Spinach

The roasted spring veggies recipe is delicious!  It comes from Cooking Light “Way to Cook Vegetarian” Cookbook!  The chicken curry is just something I put together quickly and let cook in the crock pot.

Spring Roasted Veggies:
3 tablespoons balsamic vinegar
1 tablespoon chopped shallots or red onion
1 lb. carrot, sliced
1 tablespoon olive oil
1 teaspoon kosher salt
1/2 teaspoon freshly ground black pepper
2 pounds fingerling potatoes, halved lengthwise
1/2 pound radishes chopped in half
2 cups asparagus, sliced into 2-inch pieces
1 tablespoon fresh chopped parsley
1 tablespoon fresh chopped chives
Preheat the oven to 500`.  Combine vinegar and shallots in a small bowl and set aside.
Combine carrots and the next 5 ingredients  in the bottom of a roasting pan (I used a 2-inch rimmed jelly roll pan), toss gently to combine.
Bake at 500` for 20 minutes or until they begin to brown, stirring occasionally.
Remove pan from the oven; add the shallot mixture and asparagus, tossing to combine.
Return pan to oven and bake for 5 minutes.  Stir in parsley and chives and serve hot!

Curry Chicken and Rice

The Chicken Curry is so simple!  I add Maya Kaimal Coconut Curry Sauce from Costco to 4 organic chicken breasts and 2 cups brown rice and 2 cups water in a large crock pot (adding more water if needed, throughout the cooking process).  Cook on low all day or on high for a half a day.  Simple as that!  Serve on a bed of fresh spinach!

Chipotle Bean Burritos

I love these burritos!  Lots of smoky flavor mixed with fresh cilantro from the garden and creamy sour cream make these a huge hit!
4-5 cloves garlic, chopped
Olive oil 1 can (15 oz.) pinto beans, drained and rinsed
1 can (15 oz.) black beans, drained and rinsed
1/4-1/2 teaspoon chipotle seasoning, mixed with 1/4 cup water
sea salt and pepper to taste
Whole grain tortillas
Chopped lettuce
Chopped tomatoes
Shredded sharp cheddar cheese
Avocado
Sour cream
Fresh cilantro
Salsa
Saute the garlic in the olive oil for a few minutes, stirring constantly, do not allow to burn.  Add the beans and chipotle water mixture.  Begin to smash the beans and cook until heated through and makes a thick paste.  Heat the tortillas and add your favorite toppings!